
Build-a-blog Part 1: On the cheap cheap.
Hello again and welcome to the first post of the multi-part series… Building a blog site.
In this series we’ll be looking at how one can build their own blog site through varying degrees of effort, cost, and technical experience. We’ll cover building a quick and simple site hosted on Github pages, right the way through to a self hosted cloud based blog site complete with custom domain, deployment pipeline and automatic package updates for added security.
Editors Note: Throughout this series we will be using the phrase “Blog site” but the learnings in this series can apply to any Jekyll based site.
In Part 1: On the cheap cheap, we’ll cover how you can build a simple Jekyll based blog site, hosted for free on Github pages, without needing to know anything about coding or software development. All you’ll need is a computer, a Github account and a little bit of knowledge about Markdown.
Before we begin.
Before we delve too far into building the site, you first need to ask yourselves “What sort of blog site do I want?”. Do you even want to build a blog? Perhaps you want a portfolio of your photography, an online CV with demos of your work, or maybe you just want a small single page site with a little bit of text. In the end, what you decide upon will determine how much work and time is required to get your site up and running, so it’s best to answer sooner rather than later.
Don’t rush, take your time. Think about it over a cup of tea or coffee, I’ll still be here when you’ve decided.
If after much contemplation you have decided you only want/need a single page that’s awesome. This will be much quicker and easier for you. I’d recommend checking out Github’s very own step-by-step guide. It contains everything you need to know to get your site up and running using one of their curated single page jekyll themes. Follow this and you’ll have your content published in no time.
For my Blog, Portfolio and CV peeps, or those who don’t like the Github default themes, let’s keep going.
Finding your dream theme.
If you’re anything like me you feel that aesthetics are important, perhaps overly so. That is why I find the best way to start your blog site is to do a little theme shopping. If you want you can just Google jekyll themes but if you don’t want to browse through a bunch of random sites, here’s a few I searched earlier…
When you find your dream theme hold onto the page, you’ll need it to navigate to the Github repository. Look for a button or link that mentions Github, Repository or Homepage, you should be taken to a page like this.
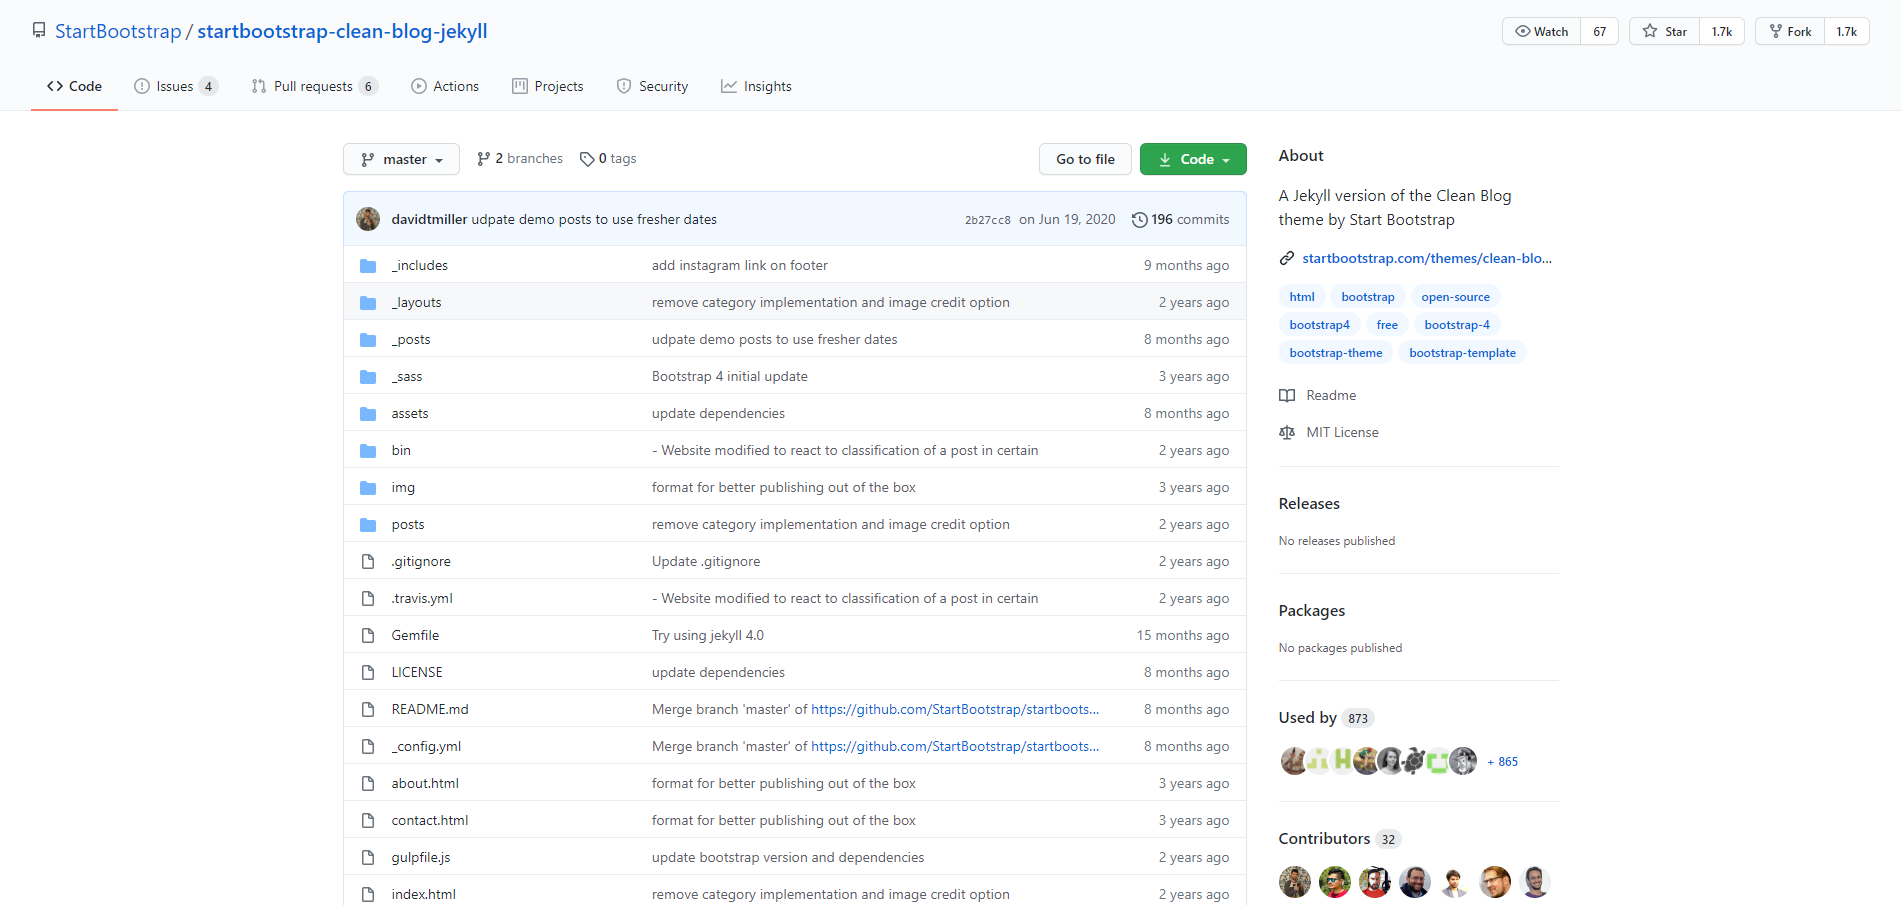
For the rest of this post I’ll be using the Clean Blog Jekyll theme but don’t worry, everything shown here should be compatible with most other themes.
Forkward unto Github.
Now that your theme is all sorted you can begin actually building your blog site. At the top right of your chosen themes Github repository you should see a little “fork” button.

Click it and you’ll either be taken to a sign-up/sign-in page or you’ll have successfully forked the repository. If you have to create an account that’s ok, it won’t take long, just bare in mind that the username of your account will dictate the default url of your blog site e.g. yourUsername.github.io
It’s all in the name.
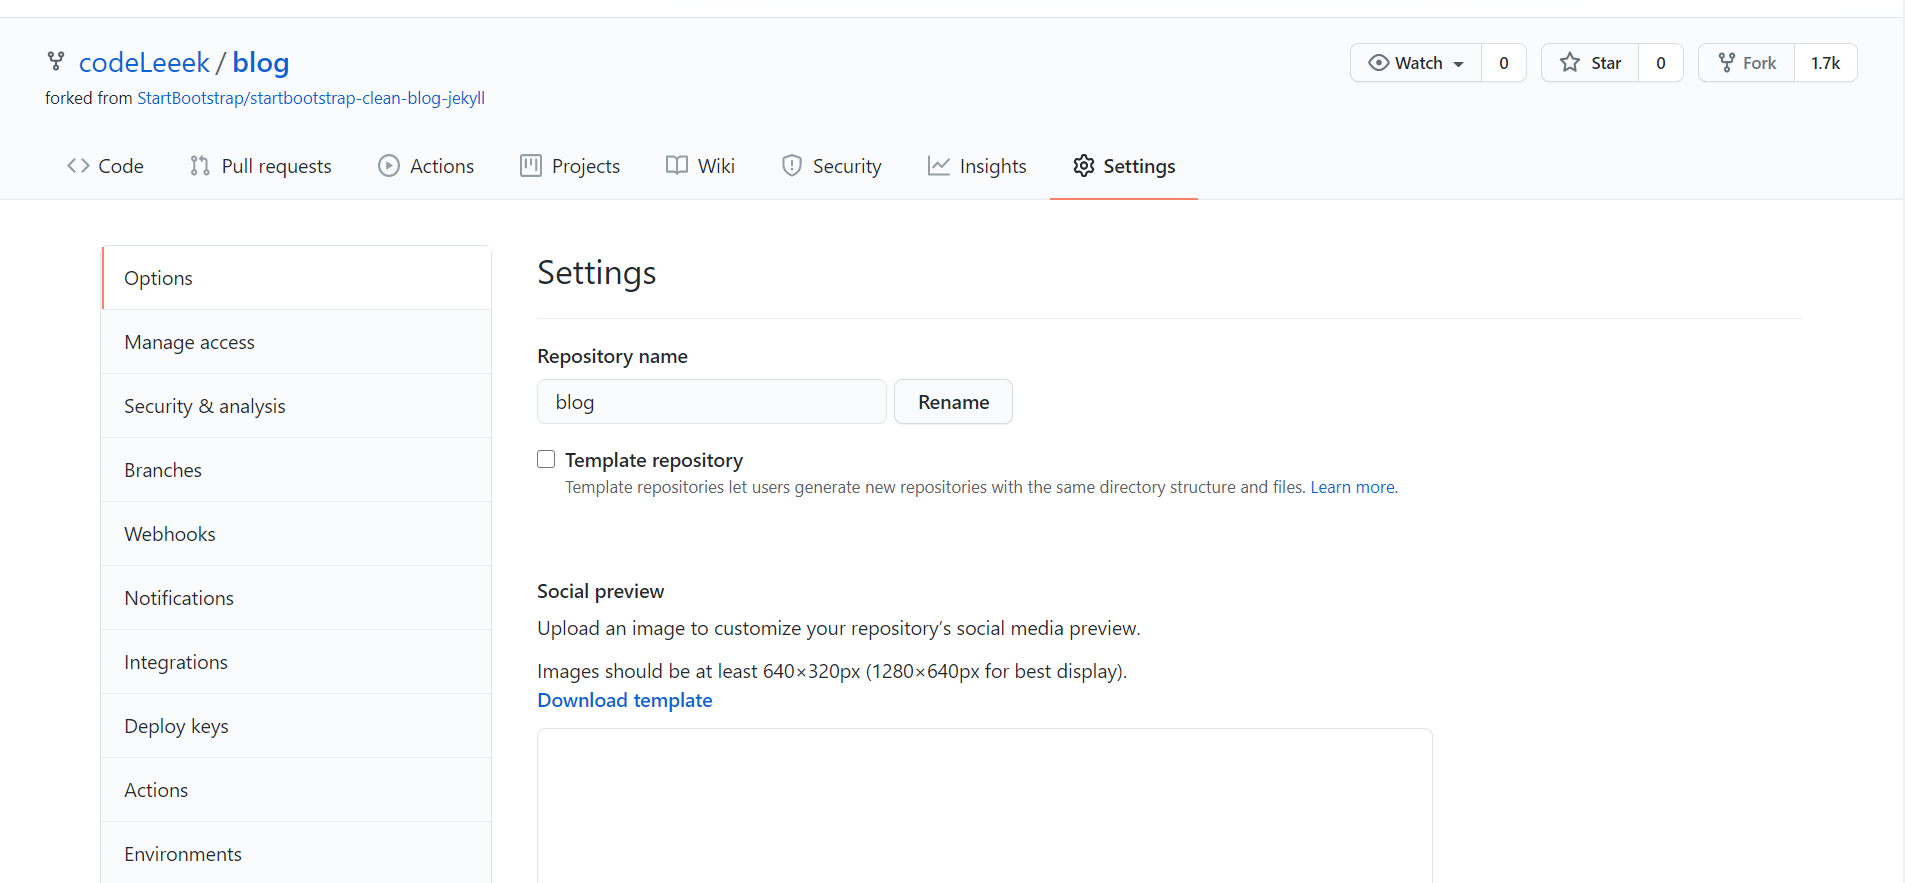
Now that you have your fork you’ll need to modify some settings to turn it into a hosted Github pages site. The first thing you’ll want to do is rename the fork. Just a heads up, what you rename your repository to will dictate the final URL of your blog site. For example if you were to rename your repository “Blog” your final URl would be yourUsername.github.io/blog, however, if you were to rename your repository to “yourUsername.github.io” your blog site will be hosted directly under that domain so your final URL would simply be yourUsername.github.io.
Does this really matter? well If you intend to host multiple sites, perhaps a blog and a portfolio, then naming your repository to “Blog” or “Portfolio” now is probably the best option, but if you only plan on having one site, keeping the content directly under the root domain just makes it a little bit easier for those visiting your site. It’s also worth noting this isn’t something that needs to be decided right away, you can rename your repository at any point in time if you change your mind at a later date.
With that out of the way, to rename your repository simply head over to settings, update the repository name and click Rename.
A branch to call your own.
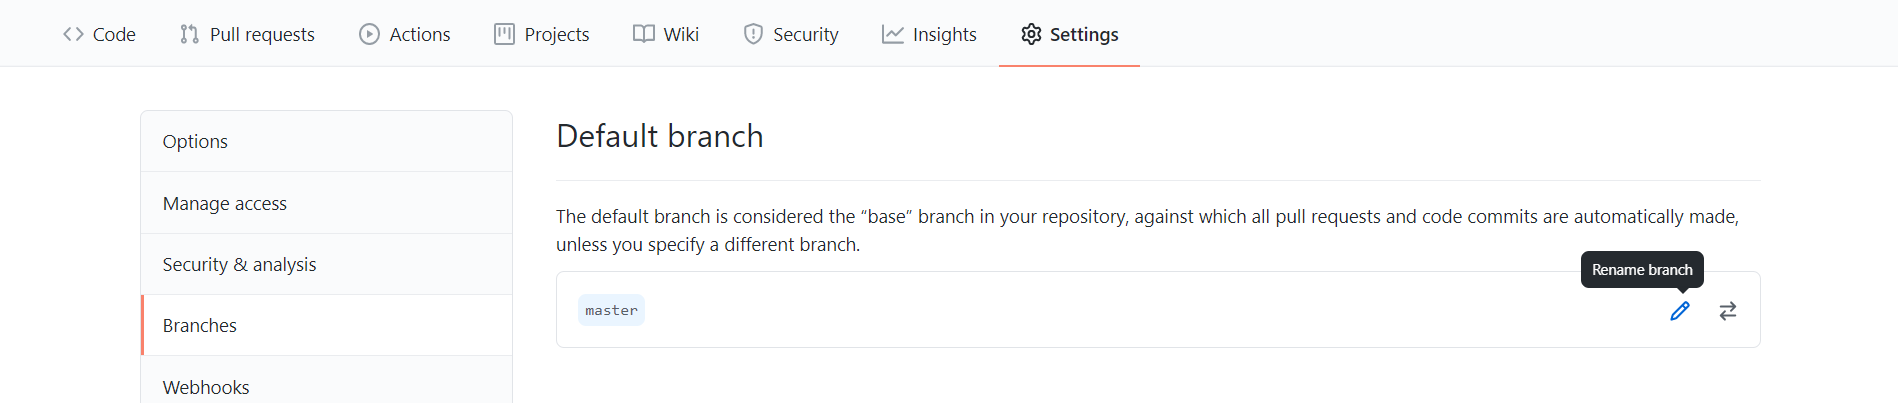
The next step is technically optional but one that I feel makes your life just little bit easier and helps to keep your options open later when it comes to keeping up to date with your chosen themes feature improvements. First you’ll want to rename the current main branch of the forked repository, likely named master or main, to “fork”. This will help keep your blog separated from the themes code.
To rename the main branch simply select the “Branches” sub menu on the Settings page and click the little pencil icon next to the main branch. This will open a little pop-up that will let you rename the branch.
The next part of the optional step is to create a new main branch, the Github documentation can show you how to do this better than I could. You can call this branch whatever you want, I usually go with “main” for simplicity but it’s not essential, just be sure to remember what you called it for later on.
It’s Alive… or it soon will be.
Right now all we have is well named repository, a couple of branches and a lot of code we’re not likely to ever read, but it’s not a live blog site yet. You’ll want to head back over to the main sub menu of the Settings page and scroll allllllllll the way to the bottom, just above the ‘Danger Zone’, and here is where you’ll turn all of this into a blog site.
In the section “Github Pages” you’ll see a sub section called “Source”. All you need to do is set the branch to your newly created main branch, click save and your blog site will be live.
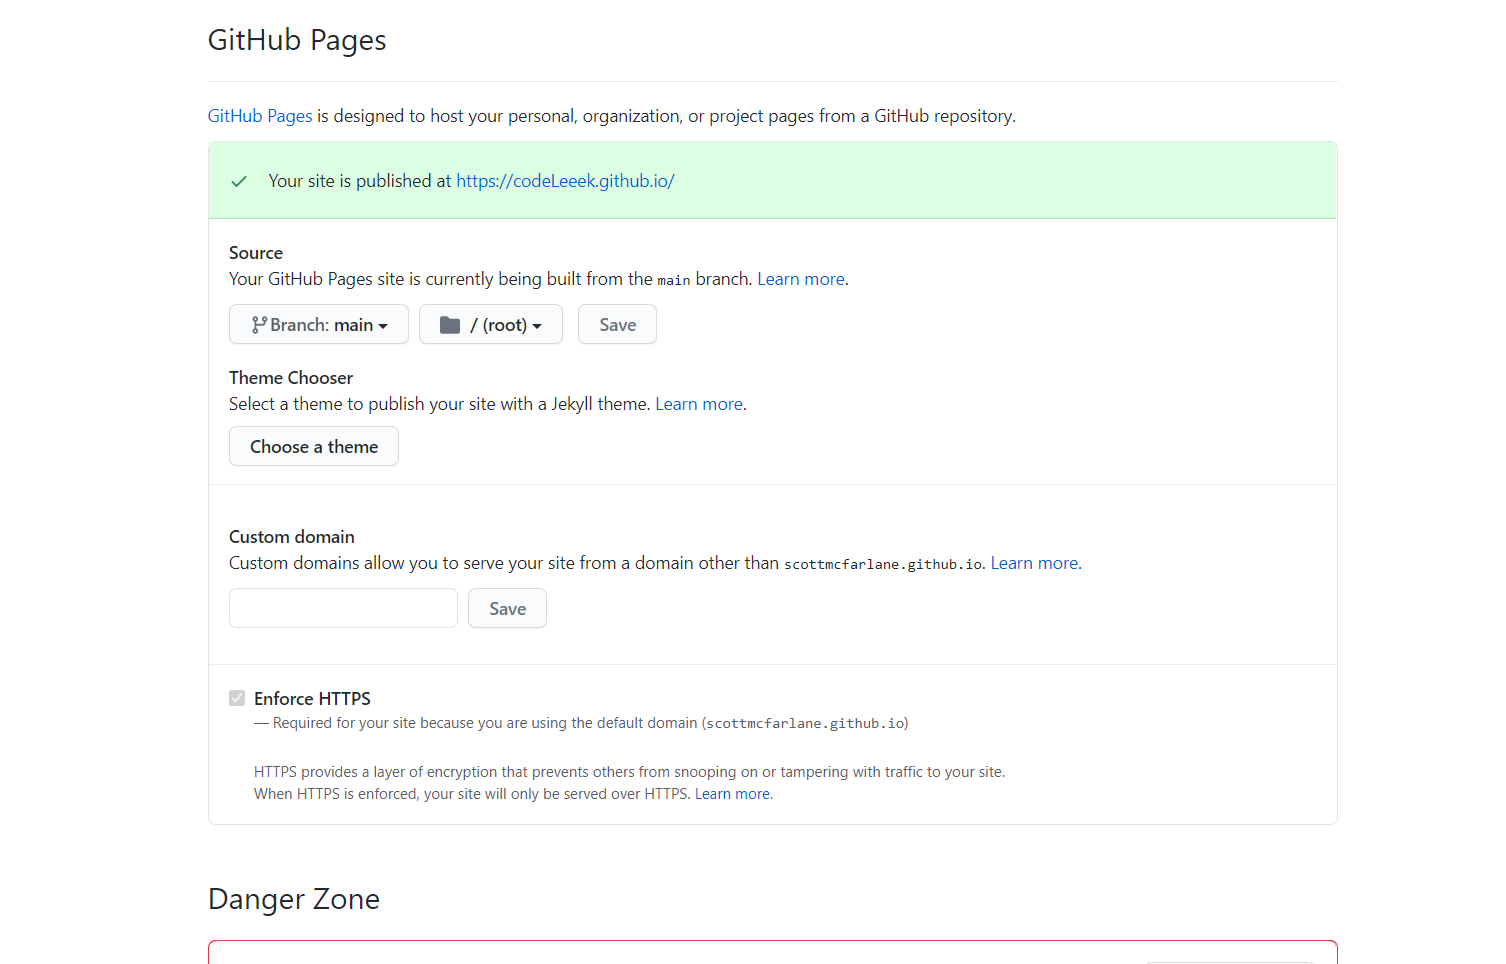
If everything worked correctly you should be able to click the link Github shows you and be taken directly to your fledgling blog site.
But don’t grab your pitchforks just yet… I know, it probably doesn’t look anything like the theme you chose, “Where’s all the styles” I hear you scream with pure outrage. Don’t worry we’ll get to that.
This is where the fun begins.
So you’ve now deployed your blog site but there are a couple of lingering issues, it likely looks awful with no styles and it’s just the themes demo, not really your blog site. Don’t fret, this is where you’ll learn how to turn this theme into your site, and it will pretty much come down to editing two files.
It’s all in the config.
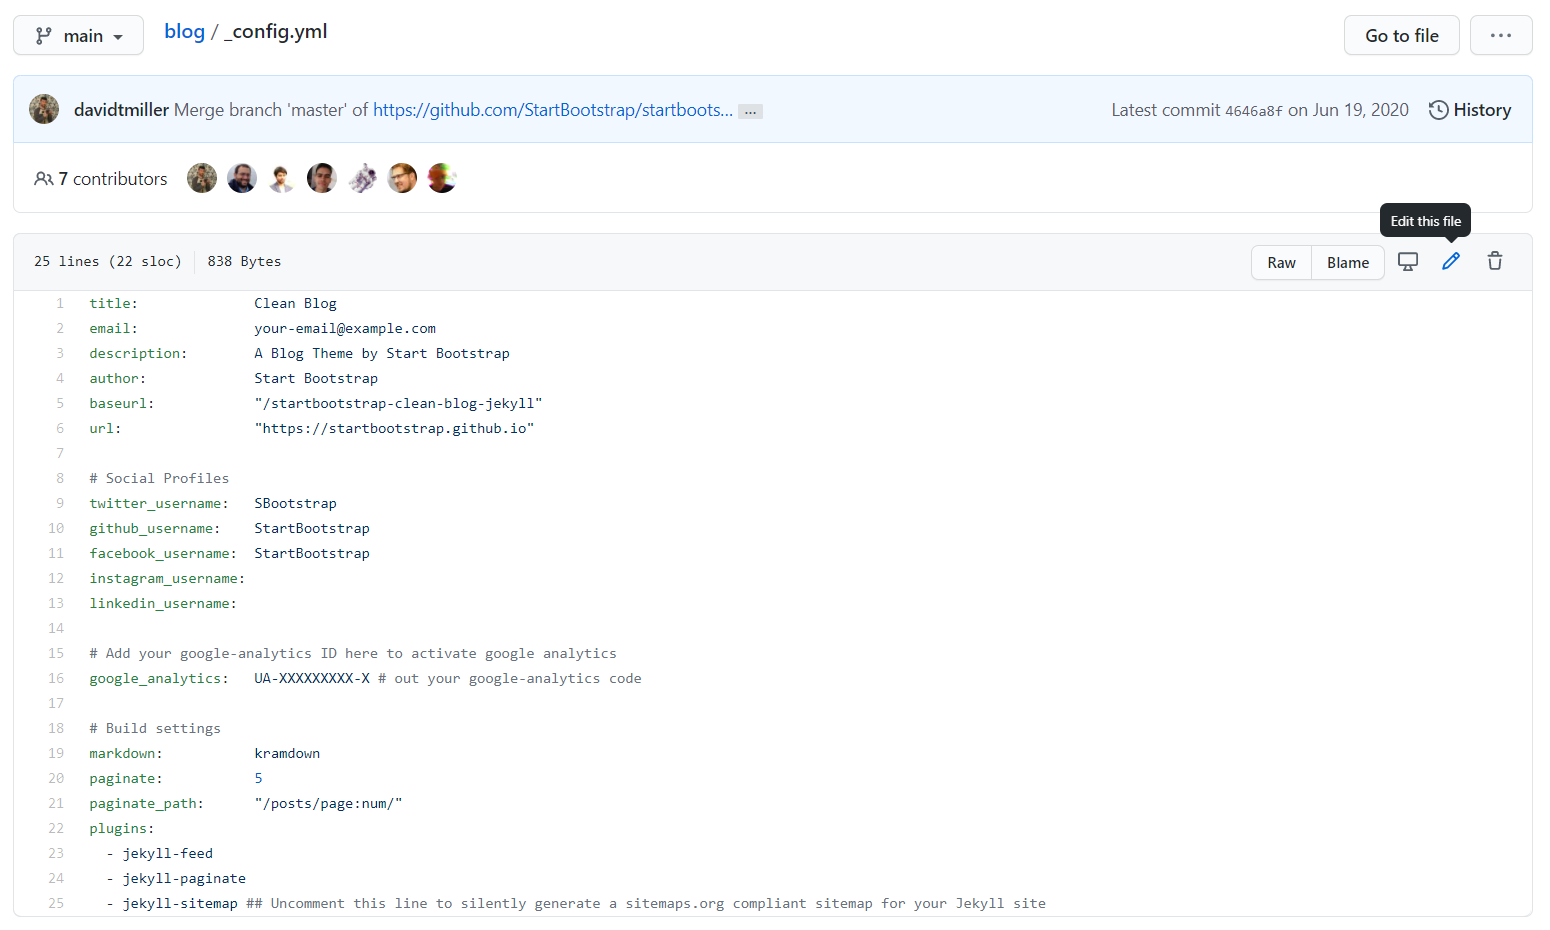
The first file you’ll want to update is the _config.yml, sometimes with the extension .yaml and it is located in the main directory, also known as the root, of the repository. Any half-decent Jekyll theme will have any configurable detail in this file so that you don’t need to worry about any HTML or CSS.
Unfortunately the specific details in a themes configuration file are going to be somewhat unique to that theme, so I won’t be able to give a step-by-step on what to change, you’re going to be on your own for some fields but don’t worry it’s pretty straight forward and the Readme file of your theme should explain things pretty well.
That being said there are some common fields that will likely show up in most themes and I’ll give a quick rundown of those.
Descriptive fields.
These are pretty self explanatory, they usually just determine some default display information or metadata. You can fill them in however you like. Some examples of descriptive config fields are:
- Title: The title of your blog.
- Description: The description of your blog.
- Author: You.
Routing fields.
These fields are quite important as they’re used by Jekyll and Github to locate and connect all of the styling assets of your site. If these aren’t setup correctly your site won’t look right. These fields are:
- url: The fully qualified domain name of your blog site e.g. https://yourUsername.github.io
- baseurl: The sub-path of your blog site. If you chose to name your repository ‘Blog’ this should be set to ‘/blog’. If you named your repository ‘yourUsername.github.io’ you can leave this empty.
Social Media fields.
These are also self-explanatory, they will dictate where the usual social media icons or links will take you. If the theme is well written leaving any of these blanks should prevent them from showing up and navigating to nowhere. Some examples of social media config fields are:
- twitter_username: Your Twitter username.
- github_username: Your Github username.
- facebook_username: Your Facebook username.
- instagram_username : Your Instagram username.
- linkedin_username: Your LinkedIn username.
Editing your config.
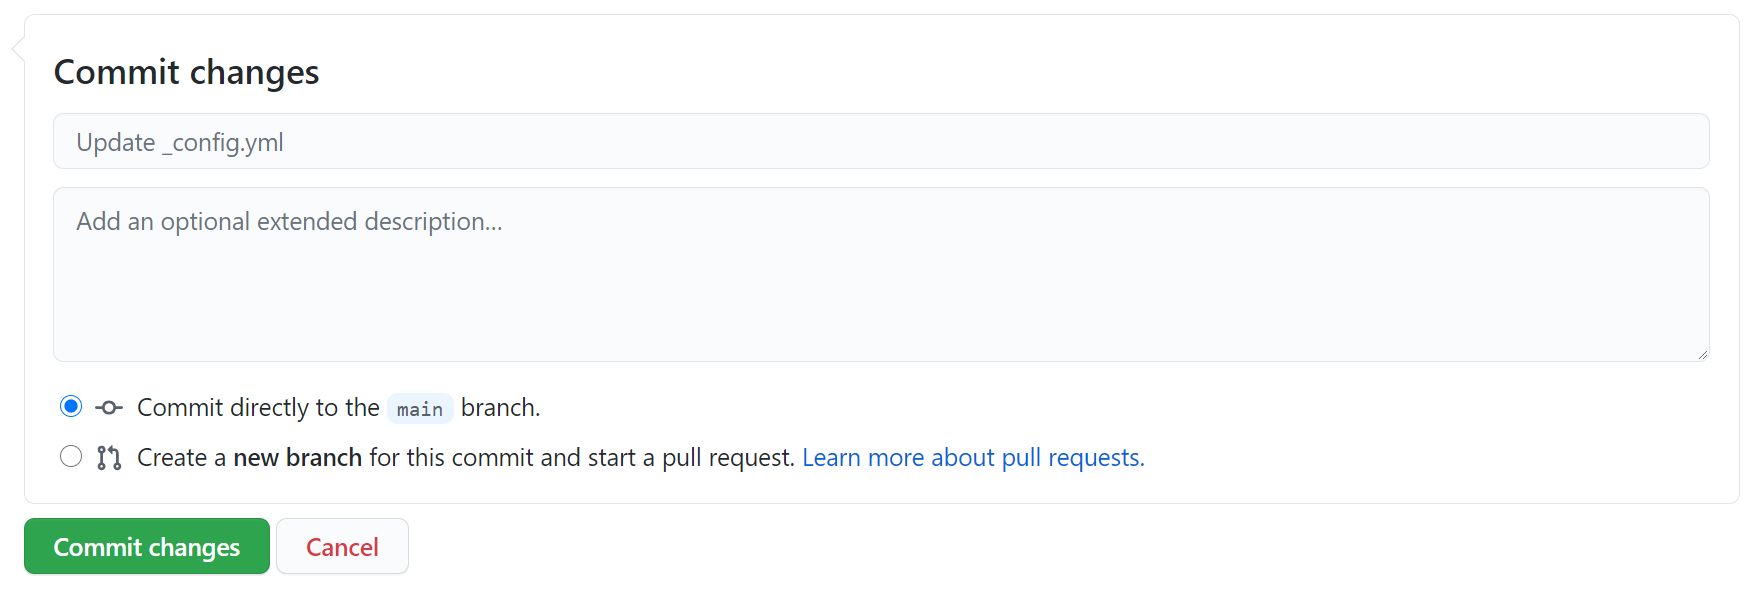
Now that you have a basic understanding of what’s in the config file, you’ll now need to edit this information. You can do this from the Github UI, all you need to do is click the _config.yml file, making sure on your main branch, then click the little pencil icon at the top.
Once you’ve made all the necessary changes simply head down to the bottom of the page and ‘commit’ your changes. This will save the changes to your main branch.
Check back on your live url and within a few minutes you should see your styling fixed, your descriptive changes applied and your social media buttons linked for all the world to see. We’re nearly there.
Your first post.
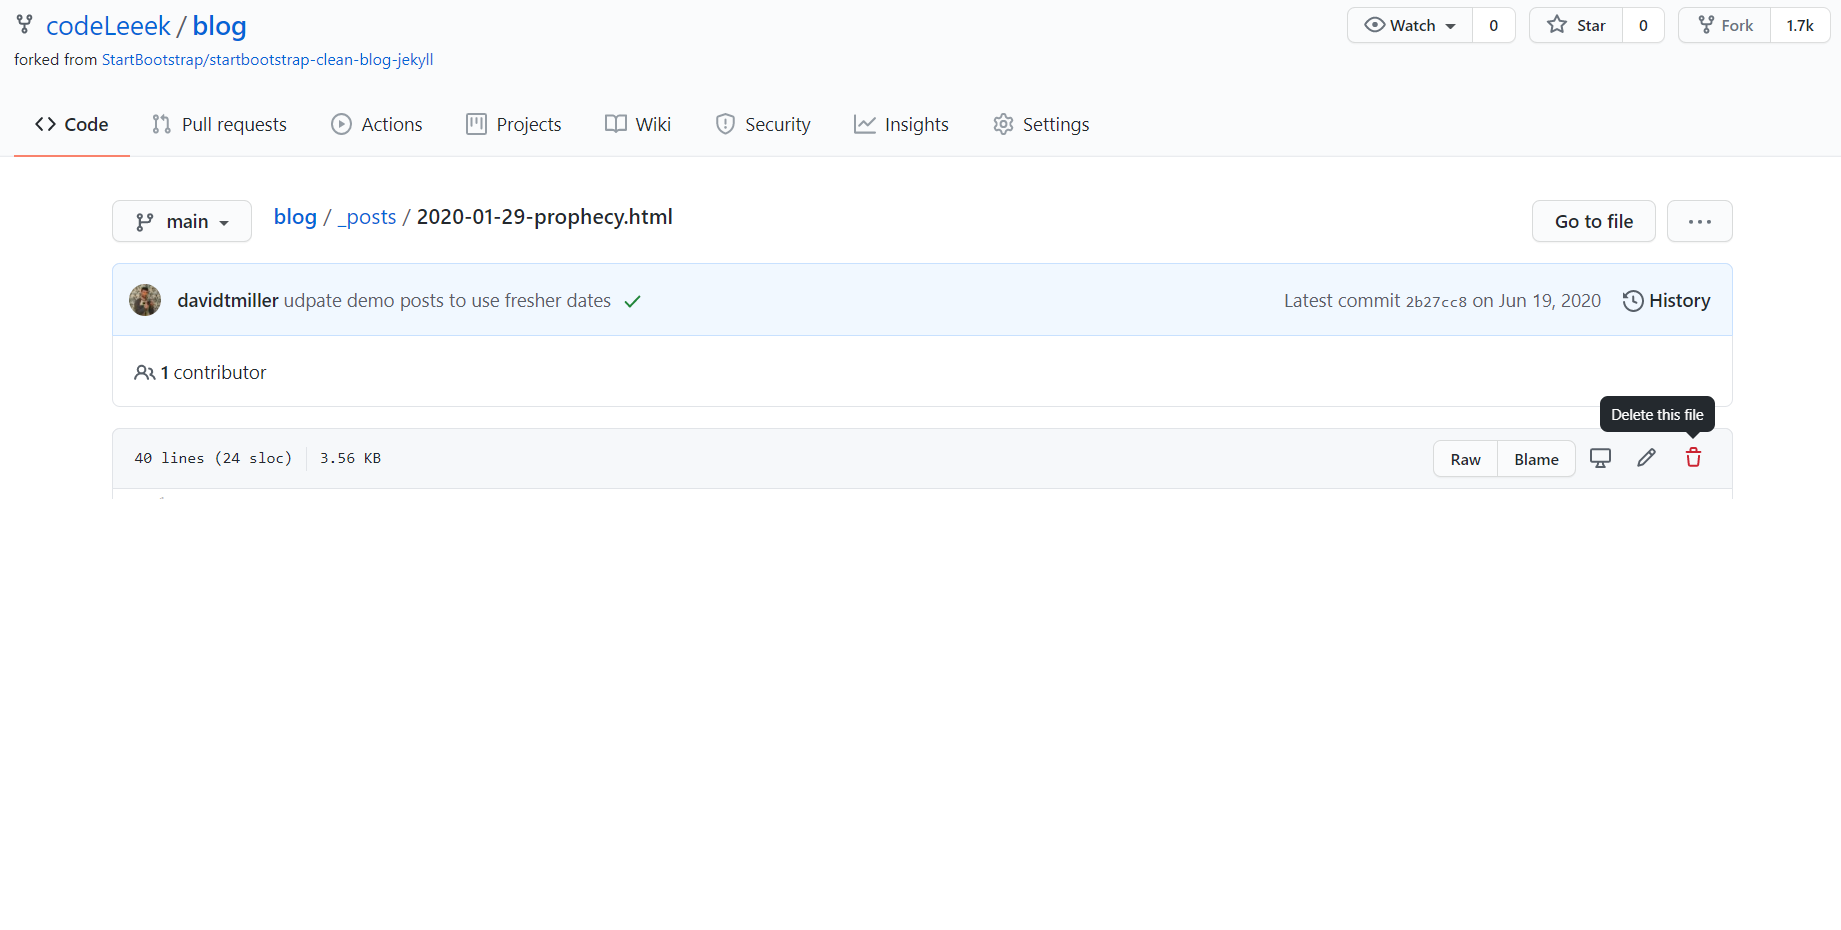
Now that your site is all configured up and looking like a true blog it’s time to publish your first post and thankfully this is super quick and easy. In the root directory of your repository there will be a folder called ‘_posts’ that contains a number of Markdown or HTML files with the naming convention yyyy-mm-dd-title.
The first thing you’ll want to do is delete the existing demonstration files. To delete a file all you need to do is open the file in the same way as the config, making sure your on the main branch, clicking the trash bin icon at the top and committing the change like before. I recommend keeping one file around initially as a reference for the file structure.
With the demo posts removed you can now create your own file. Don’t worry if the _posts folder has disappeared, Github won’t show empty folders.
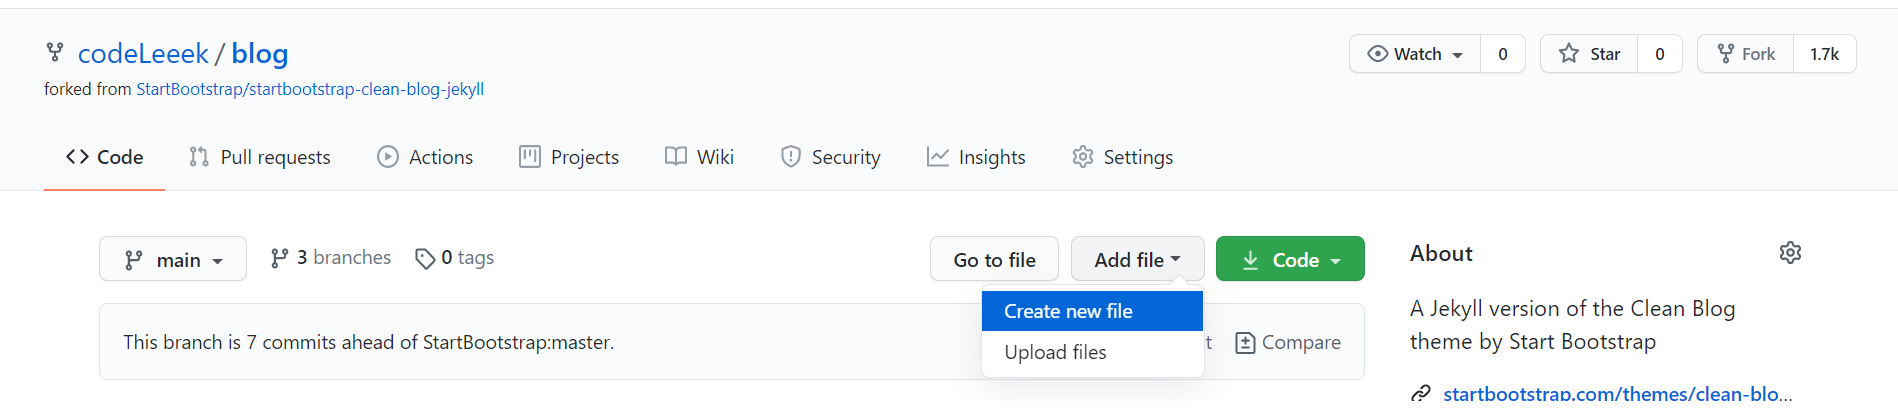
To create a new file, from the root directory simply click Add file then Create new file.
For the name of the file you’ll want to include _posts/ in front to ensure it’s saved in the right location, followed by the yyyy-mm-dd-title.markdown where yyyy-mm-dd is the date you intend to publish and title is the title of your blog e.g. _posts/2021-02-16-my-first-post.markdown. If the theme you’re using originally had html files instead you’ll likely need to use .html instead of .markdown.
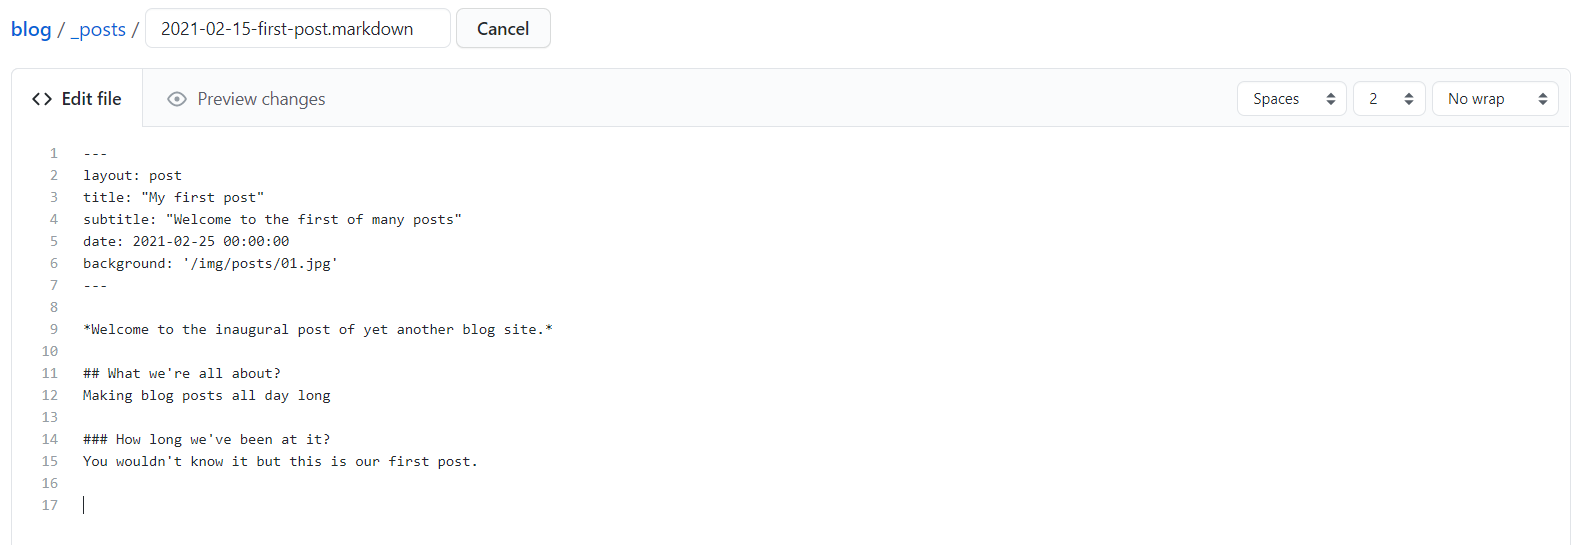
With the name out of the way you can begin working on the content of your post. Posts in Jekyll are broken up into two sections, at the top, sandwiched between a set of — markers will be some basic information about your post, below that will be the content of your post.
The basic information.
Alas just like the configuration file the exact structure of the top section, known as the front-matter by Jekyll, will be somewhat unique to your theme, however, it will likely be the same information, just with different titles and again the Readme file of your theme should explain things pretty well. An example of this section would be:
- layout: Indicates the styling to be used for the post. This will likely always be set to ‘post’.
- title: The title of your blog post
- subtitle: A quick intro for your post.
- date: The date at which it will be posted in the format of yyyy-mm-dd hh-mm-ss. If this is in the future the post won’t appear.
- background: An image for your the header of your post, usually stored in the “/img/posts/” directory.
The content.
This is where the body of your post lives, and where I cannot guide you on this journey. What you blog about and how you do it will be up to you and the theme you chose. I can give you a bit of guidance when it comes to the how of styling, if your theme uses markdown checkout this guide for some useful tips on creating a markdown page. If your theme uses html then I’d recommend checking out W3Schools for a crash course in the html tags you can use to style your content.
Publish it.
Once you have your content written up it should look something like this
Now all you need to do is commit the file, sit back, wait a few minutes for Github to build and publish your site and enjoy having published your very first post on your new, awesome looking blog site.
Final thoughts.
That wraps up Part 1: On the cheap cheap of the Build-a-Blog series. Thank you for reading and I hope you were able to get some useful information out of it, or even helped you build your own site. If there’s anything you think I left out, could explore more or just have feedback in general let me know in the comments below.
If you don’t like having github.io in your blog site stay tuned for more posts in this series, next up we’ll look at the how and why of setting up your own custom domain.